Custom t-shirt designs are much more than just a simple print. Think of them as a way to tell who you are without saying a word, a marketing tool that walks on its own, and a symbol of identity to connect with others. With them, something as basic as a t-shirt becomes a canvas to communicate passions, ideas, or your brand’s values in a direct and very personal way.
The power of a well-executed design
Far from being a simple promotional object, a custom t-shirt is a whole statement of intent. For you, as an individual, it’s the opportunity to proudly wear your hobbies: the logo of your favorite video game, an iconic phrase from a movie, or a minimalist design that fits with who you are. That ability to connect with others through shared tastes is one of the keys to the success of this trend. If you want to better understand this phenomenon, you can check out our article on the fashion of wearing original t-shirts and its impact.
For companies, custom t-shirt designs are a brutally effective marketing move. An attractive design not only makes your brand more visible, but also creates a sense of belonging among your employees and customers. It’s like having a mobile billboard that people choose to wear because they want to.
A booming market
That personalization is in fashion is not just a feeling; the numbers confirm it. The global personalized clothing market is projected to reach 140.2 billion dollars by 2035, growing at an annual rate of 9.8%. In Spain, the trend is crystal clear: between 40% and 65% of people prefer products that reflect their identity.
This boom is largely due to printing technologies becoming much more accessible. They have democratized the entire process. Today, anyone can transform a creative idea into a tangible garment with professional-looking quality.
A custom t-shirt stops being an object and becomes a story. It’s the way a brand, a team, or a person tells the world who they are without opening their mouth.
Why is your design so important?
The success of a custom t-shirt depends, almost 100%, on the quality and impact of its design. A good design is capable of:
- Capturing attention instantly: A well-made graphic or a clever phrase generates curiosity and makes people turn their heads.
- Communicating a clear message: Whether it’s a brand’s value, the spirit of an event, or a personal passion, the design conveys it at a glance.
- Generating an emotional connection: People are attracted to designs that resonate with their experiences, their tastes, or their sense of humor.
In this guide, we’re going to tell you how you can transform your vision into a garment that really makes an impact. From technical requirements to where to find inspiration, we’ll give you the tools to create custom t-shirt designs that not only look great, but communicate your message with all the strength it deserves.
How to prepare your file for perfect printing
So that your custom t-shirt designs turn out as amazing on the fabric as they look on the screen, it’s key to prepare the file properly. Don’t stress, you don’t need to be a graphic design expert. As long as you get a couple of basic concepts down, you’ll make sure the final result is sharp, with vibrant colors and a professional finish.
Think of it this way: your design is like a cake recipe. If you use bad ingredients or get the measurements wrong, the result will be a disaster, no matter how good the idea was. The same goes exactly for print files. A poorly prepared file can end up in a t-shirt with dull colors, pixelated edges, or blurry details.
Vector or raster? Understanding the key difference
The first big decision you have to make is choosing between two types of files: vector and raster (also known as bitmap). Understanding how they differ is the most important step to getting a top-notch print.
A vector file is like an architect’s blueprint. It’s built with mathematical formulas that define each line, curve, and shape. Whether you want to make a small model or build a skyscraper, the blueprint can be enlarged infinitely without losing a shred of quality. The edges will always, always be perfectly sharp.
On the other hand, a raster file is like a digital photo. It’s made up of a fixed grid of colored little squares called pixels. If you try to enlarge that photo too much, you’ll start to see those squares, creating the typical “pixelated” or blurry effect. Its quality depends directly on how many pixels it has.
The golden rule: Use vectors for logos, text, and graphics with solid colors. Raster files are for photographs or illustrations with lots of details and color gradients.
What file format to use in each case
Now that we’re clear on the difference, let’s see what specific formats you should use for your t-shirt designs. Each one has its moment and its place.
-
Vectors (the sharpness champions):
- SVG (Scalable Vector Graphics): A modern and super versatile format, perfect for both web and print. It maintains quality at any size without a hitch.
- AI (Adobe Illustrator): It’s the native format of the world’s most used vector design program. Let’s say it’s the industry standard.
- EPS (Encapsulated PostScript): A somewhat older vector format, but still very reliable because it works so well with almost all design programs.
-
Raster (the kings of photographic detail):
- PNG (Portable Network Graphics): It’s the star format for rasterized images in textile printing because it allows transparent backgrounds. This is essential if you don’t want your design to appear inside a white or colored box.
- JPG/JPEG (Joint Photographic Experts Group): Works great for photographs, but watch out—it doesn’t support transparency. It will always have a background, whether you want it or not.
- PSD (Adobe Photoshop Document): The native file format for Photoshop. It’s very useful if you need to send the design with all its layers so adjustments can be made later.
To make it clearer for you, here’s a small comparative table that will help you decide.
File format comparison for printing
A quick guide to choose the correct file format based on your custom t-shirt design type.
| File type | Ideal for | Key advantages | When to use it |
|---|---|---|---|
| SVG | Logos, icons, text, flat graphics. | Infinite scalability, lightweight files. | When you want perfect sharpness at any size. |
| AI / EPS | Complex designs, professional logos. | Industry standard, editable by layers. | When working with designers or professional printers. |
| PNG | Detailed illustrations, background-free designs. | Support for transparency, good compression. | Essential if your design is not rectangular. |
| JPG / JPEG | Full-color photographs. | Small file size, ideal for photos. | Only if your design is a rectangular photo that fills the entire area. |
In short, if your design is a simple logo or graphic, vectors (SVG, AI, EPS) are your best friends. If it’s a complex illustration or a photo, go with a PNG with a transparent background.
Resolution: the magic rule to avoid blurry designs
If you finally decide on a rasterized file like a PNG, there’s a magic number you need to remember: resolution. It’s measured in DPI (Dots Per Inch), or dots per inch, and basically tells us how many pixels from your image will be printed on an inch of fabric.
For t-shirt printing, the gold standard is 300 DPI. A file with lower resolution, like the 72 DPI used for screens, will look great on your phone, but when printed on a t-shirt it will look blurry and terrible.
It’s like building a wall. For it to be smooth and detailed, you need to use small, tightly-packed bricks (300 DPI). If you use large bricks with gaps between them (72 DPI), the wall will look rough and shoddy.
Color models: the difference between RGB and CMYK
The last technical pillar you need to know is the color model. The screens on our computers and mobile devices create colors by mixing red, green, and blue light. This is known as the RGB (Red, Green, Blue) model. It’s an “additive” model, where the sum of all lights gives white color.
Printers, however, work the opposite way. They mix cyan, magenta, yellow, and black inks to achieve colors. This is the CMYK (Cyan, Magenta, Yellow, Key/Black) model. It’s a “subtractive” model: the mixture of all inks absorbs light and produces a black (more or less).
And why am I telling you all this stuff? Because the range of colors a screen can display (RGB) is much larger and brighter than what a printer can reproduce (CMYK). If you design in RGB, it’s very likely that those electric and super vibrant colors you see on screen will become duller and blah when printed. To save you from headaches, the ideal thing is to configure your design program in CMYK mode from the very first minute.
Choose the ideal printing technique for your design
You already have your design file ready: correct format, perfect resolution, and the right color model. Now it’s time to make the second big decision: how do we bring that idea to life on the fabric? Trust me, the printing technique you choose is just as important as the design itself. Each method has its strengths and adapts better to certain styles, quantities, and, of course, to your budget.
Think of it as if you were a chef. You have the best ingredients (your design), but now you need to choose the right cooking technique. You wouldn’t use a blowtorch to make soup, right? Well, the same goes here. If you choose the wrong method, you can end up with dull colors, a plastic feel, or a unit cost that goes through the roof.
So it doesn’t happen to you, let’s break down the four most popular printing techniques. That way you can decide with all the information and make sure your t-shirt turns out exactly as you imagined it.
Screen printing: the champion of large runs
Screen printing is the classic technique, the veteran of the group. The process involves pushing ink through a mesh stretched on a frame. The interesting thing is that each color in your design needs its own screen, which makes it an almost artisanal and very precise process.
Imagine it as if you were painting with stencils. You create one stencil for red, another for blue, and so on with each color. You apply the red ink, let it dry, and then move on to the next. The result is incredibly vibrant color and bomb-proof durability. The ink sits as a solid, opaque layer on the fabric.
- Ideal for: Large orders (from 20-25 units), designs with few solid colors, logos, and text.
- Advantages: The cost per t-shirt plummets the larger your order is. Colors are very vivid and the print lasts forever.
- Limitations: It’s not worth it for small orders because of the cost of creating the screens. It’s also not the best option for photos or designs with lots of color gradients.
Direct-to-garment printing (DTG): photographic detail
Direct to Garment Printing, or DTG (Direct To Garment), is basically an inkjet printer like the one in your office, but for clothes. A specialized machine sprays textile inks directly onto the t-shirt, and the fabric absorbs the color.
This method is the king of detail. It’s capable of reproducing photographs, complex illustrations and millions of colors with mind-blowing precision. The ink integrates into the fibers, which gives it a very soft and breathable feel, without the typical “sticker effect”.
- Ideal for: Small orders or even single t-shirt designs, complex designs with lots of colors, gradients or photographic details.
- Advantages: There are no setup costs, so it’s perfect for short runs. It offers unmatched detail quality and a super soft finish to the touch.
- Limitations: It’s more expensive per unit if you do a large order. Colors can be a bit less vibrant than screen printing, especially on dark t-shirts, which need a white base underneath.
DTG is to screen printing what a photo printer is to paint stencils. One looks for detail and complexity in few units; the other, efficiency and color power in large volumes.
Textile vinyl: the perfect finish for text and logos
Textile vinyl isn’t exactly a printing technique, but rather a cutting and heat transfer method. A plotter is used to cut your design into a vinyl sheet of a specific color and then it’s applied to the t-shirt with a thermal press.
It’s the perfect option for single-color designs, like names, sports numbers or well-defined logos. But its strong point is that it allows special finishes that other techniques can’t achieve: metallic effects, glitter, fluorescent or even velvet effects.
- Ideal for: Text, numbers, simple logos and any design looking for a special and different finish.
- Advantages: The finish is super sharp and opaque. You have a huge variety of textures and effects to choose from. Plus, it’s very durable if you take care of it.
- Limitations: It’s not practical for designs with lots of small details or multiple colors, because each piece has to be cut and applied separately. A real headache, to be honest.
Sublimation: colors that last forever
Sublimation is a process that seems like magic. The design is printed on special paper and, when heat is applied to it, the ink goes from solid to gaseous state and fuses forever with the fabric’s fibers. It doesn’t stay on the surface, but becomes part of the fabric itself.
The result? A print that you don’t feel to the touch, is completely breathable and will never crack, peel or lose color. It’s literally indelible. The only “but” is that it only works on polyester fabrics (or with a high percentage) and on white or very, very light backgrounds.
- Ideal for: Sportswear, technical t-shirts and any polyester garment. Full-color designs that cover the entire t-shirt.
- Advantages: The print is permanent and withstands all washes without deterioration. The colors are extremely vibrant and the feel is virtually imperceptible.
- Limitations: It can only be done on polyester garments in white or light colors.
To give you a clearer idea, this simple decision tree can help you visualize which path to take depending on how your design is.
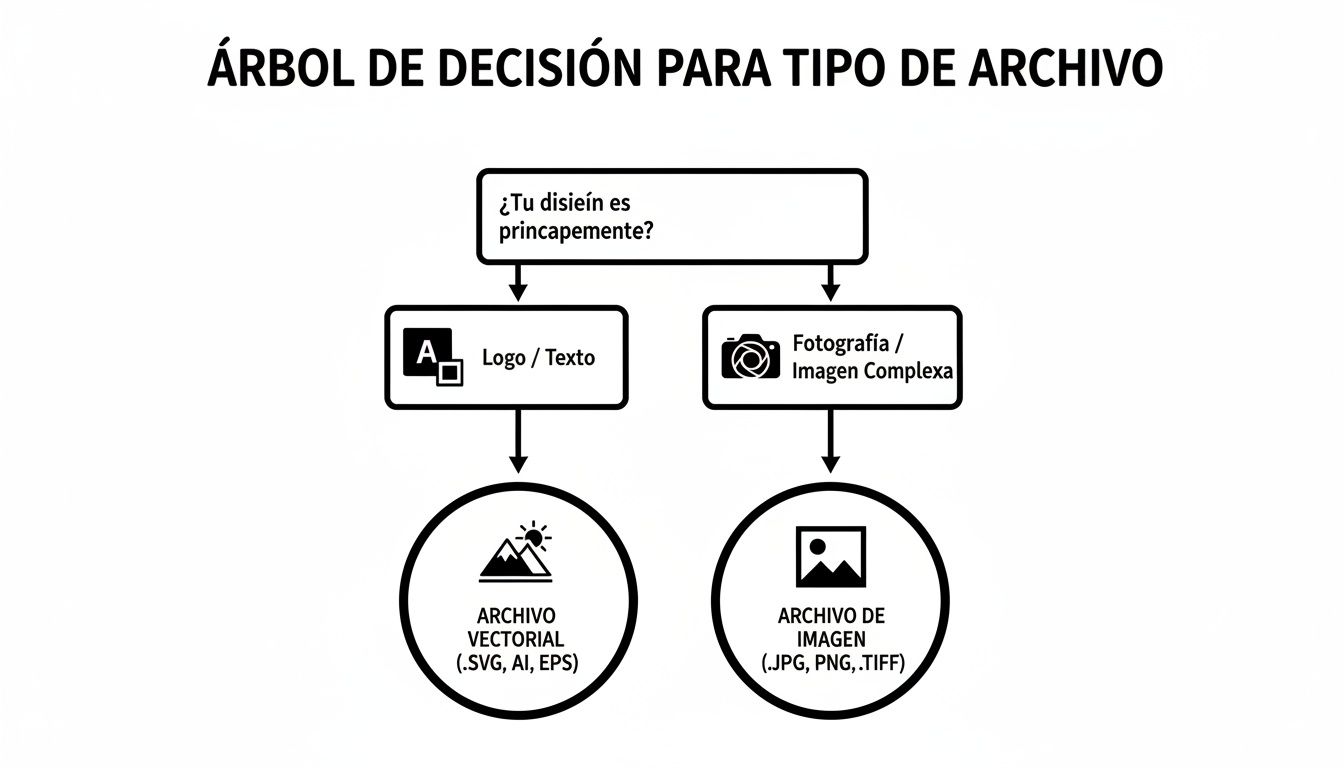
As you can see in the graphic, the first major decision is whether your design is a simple graphic or a complex image, which guides you toward vector or image format. Choosing the correct printing technique is the next logical step to ensure that file becomes a spectacular t-shirt.
Sources of inspiration and trends in t-shirt design
You now have a blank canvas and have chosen the printing technique, but… what do we design now? Let’s face it: sometimes, the most complicated part of creating custom t-shirt designs is finding that initial spark, that idea that ignites everything.
Fortunately, current trends give us plenty of clues. The world of design is a huge universe, with paths ranging from the subtle elegance of minimalism to the explosion of color in pop culture. Finding a good idea is like searching for treasure; it might be on a design platform, in the lyrics of your favorite song or in a chat with friends. The key is to keep your eyes wide open.
Minimalism that speaks for itself
Sometimes, less is much more. This philosophy has taken root in fashion, and t-shirts are no exception. A minimalist design doesn’t need fireworks to get noticed. Its strength lies in simplicity, in a direct and emphatic message.
Imagine a single word with powerful typography, a simple line that sketches an unmistakable silhouette or a small icon that represents a giant idea. These types of designs are elegant, easy to mix and match, and convey tremendous confidence. They’re perfect for brands with a sophisticated touch or for anyone who prefers subtlety over loudness.
The power of retro and vintage nostalgia
Fashion is a boomerang. What seemed outdated yesterday returns with more force than ever today. Designs with that aesthetic from the 70s, 80s or 90s are experiencing a second youth, and for good reason. Typography with a worn effect, slightly muted colors and graphics that recall old advertisements or video game covers connect directly with nostalgia.
And what’s curious is that this style doesn’t just appeal to those who lived through that era, but also to new generations who idealize it. A well-executed retro design tells a story and gives a garment unique character. According to market analysis, in Spain there is a clear trend toward retro aesthetics, with an interest in oversize silhouettes that has grown by 92%. If you want to dive deeper, you can read more about these t-shirt trends and see how vintage is setting the pace.
The best designs don’t just decorate a t-shirt; they turn it into a meeting point. They’re a signal for others with your same passions to recognize you and connect with you.
The geek universe as an inexhaustible source of ideas
The geek world has gone from being a corner for a few to dominating popular culture. And, for personalized t-shirt designs, it’s a real goldmine. References to anime, manga, video games, comics, series and movies are a common language understood by millions of people.
A design with your favorite anime character, the logo of a guild from your video game, or an iconic phrase from a superhero is much more than a simple drawing: it’s a declaration of intent. It’s a knowing wink that only other fans will catch on the fly, creating an instant and very powerful connection. If this is your territory, our guide on the coolest geek t-shirts for every nerd will give you plenty of ideas to get started.
Where to find your next big idea
Drawn a blank? Don’t worry, it happens to all of us. Luckily, the internet is brimming with creativity. If you need a push, here are some places that never fail:
- Behance and Dribbble: Imagine the online portfolio of thousands of designers and artists from around the world. That’s exactly what it is. Search for terms like “t-shirt design” and get ready for a visual feast.
- Pinterest: It’s basically an infinite inspiration search engine. Create a board and start saving all the designs, illustrations and color palettes that catch your eye. You’ll see how ideas start to connect.
- Color palette tools: Pages like Adobe Color or Coolors are great for generating color combinations that work. A good color scheme can completely transform even the simplest design.
- Life itself: Sometimes, the best idea is just around the corner. Pay attention to posters on the street, the cover of a book, or even patterns on tiles. Inspiration can strike at any moment and place.
In the end, it doesn’t matter if the t-shirt is for a corporate event, for a team uniform, or simply for yourself. The secret is finding a concept that resonates with you and with whoever is going to see it. Because a good design doesn’t just look good; it also communicates, connects, and turns a simple t-shirt into something truly yours.
The importance of design placement and size
You already have an awesome design and you’ve chosen the perfect printing technique. Great! But now comes a step that many overlook and that can make the difference between a spectacular t-shirt and one that looks weird: the placement and size of the print.
Think of it this way: your design is the protagonist of a movie and the t-shirt is the stage. If you place the main actor in a dark corner with poor lighting, their performance, no matter how incredible, will lose all its impact. With personalized t-shirt designs it’s exactly the same. An amazing graphic can look tiny and lost if it’s too small, or overwhelming and distorted if it’s too large.
The key is visual harmony. The right placement and size ensure that the design integrates naturally into the garment, guiding the eye and conveying the message clearly. Poor positioning can make the t-shirt look cheap or amateurish, regardless of how good the design or print quality is.
The most common printing zones
Although you can print almost anywhere, there are standard locations that simply work. They are safe bets that offer proven results. Knowing them is the first step to getting it right.
- Full chest: It’s the classic location, the most popular one. The design is centered on the torso, becoming the focal point of the garment. It’s ideal for large graphics, eye-catching illustrations or messages you want to be read from a distance.
- Left chest: A more subtle and elegant option, perfect for logos, shields or small designs. It’s placed at heart level, often associated with uniforms or brands seeking a discreet and professional touch.
- Full back: Like the full chest, this area offers a huge canvas for impactful designs. It works great for event t-shirts, sports teams or phrases that generate a second glance when you turn around.
- Nape (exterior): A small but very effective detail. It’s a perfect place to put your brand logo or a small icon, adding a touch of professionalism without overloading the main design.
Size matters, and a lot
Once you’ve chosen the zone, it’s time to decide on the size. A very common rookie mistake is using the same design size for all t-shirt sizes, from an S to an XXL.
A design that looks perfect on a size M can look like a tiny sticker on an XXL, or a giant poster that gets distorted on an S. The key to a professional finish is to scale the design proportionally to the t-shirt size.
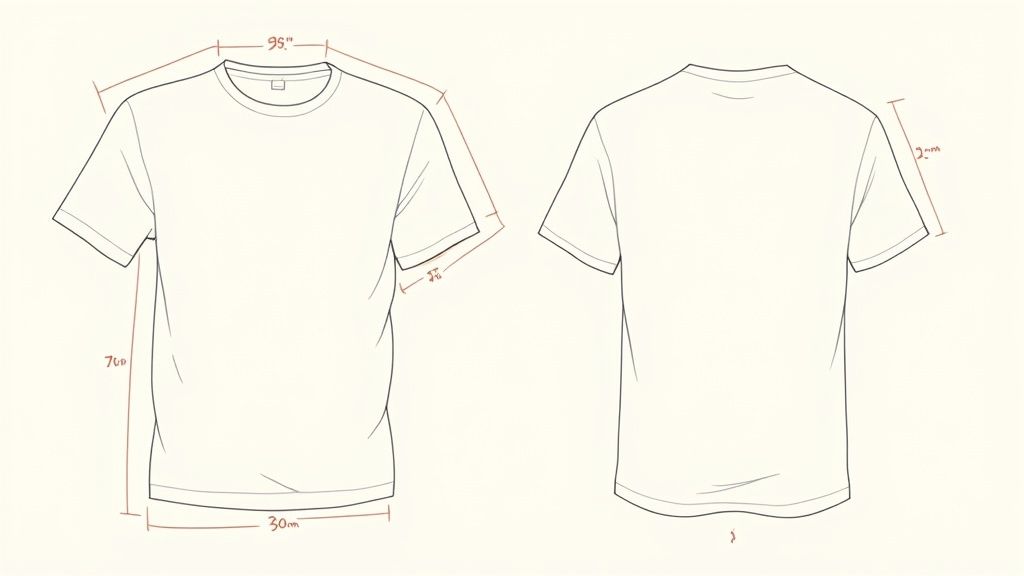
So you don’t have to go in blind, we’ve prepared a cheat sheet with recommended measurements. Think of these numbers as an excellent starting point for the most common positions on a standard adult-sized t-shirt (like an M or L).
Design sizes and placement guide
Here’s a table with the recommended measurements for the most common print positions on a standard-size t-shirt. Keep it handy!
| Design position | Recommended maximum width (cm) | Recommended maximum height (cm) | Application tip |
|---|---|---|---|
| Full chest | 28 – 30 cm | 35 – 38 cm | Leave about 7-8 cm of distance from the neck so it doesn’t sit too high. |
| Left chest | 10 – 12 cm | 10 – 12 cm | The center of the design should align with the left edge of the neck. |
| Full back | 30 – 32 cm | 38 – 40 cm | Place it about 10-12 cm below the neckline for optimal viewing. |
| Back neck (outside) | 8 – 10 cm | 5 – 8 cm | Center it and place it about 2-3 cm from the neck edge for a subtle detail. |
Of course, remember that this is just a guide. A foolproof trick is to print your design on paper at actual size and place it on a t-shirt to see how it looks. This simple step will save you a lot of headaches and ensure that each of your custom t-shirt designs has the balance and presence it deserves.
The t-shirt market in Spain: why are prices the way they are?
To order your custom t-shirt designs, it’s helpful to understand a bit about how the sector moves in Spain. It’s not just about finding a supplier and that’s it, but about getting why something costs what it costs and what factors are behind production.
The thing is, the textile landscape has undergone a massive shift. Industrial t-shirt manufacturing here has collapsed: we went from producing 32.4 million units in 2019 to barely 8.6 million in 2024. That’s a drop of 73.3%. At the same time, the cost per t-shirt has risen from €5.58 to over €7.00. If you want to dig deeper into this situation, this analysis from Modaes explains it in detail.
This price increase and reduced production capacity directly affect the workshops that customize t-shirts. Running large batches in the country is more expensive and complicated than before, and you really notice it especially when you order just a few units.
The solution: print-on-demand production model
To ride this new wave, many workshops have switched to the print-on-demand production model. The idea is simple: instead of printing hundreds of t-shirts and crossing your fingers to sell them, each garment is printed only when someone orders it.
It’s a really smart response to those high costs. It allows businesses to offer an almost infinite catalog of designs without the risk of being stuck with unsold stock. For you, as a customer, this translates into access to many more designs, especially niche ones, that otherwise wouldn’t be worth producing. If you’re curious about this, take a look at our article on how many people buy personalized t-shirts, where we explore these trends.
On-demand production has changed the game. It has turned a cost problem into an opportunity for hyperpersonalization, making it possible for even the rarest designs to find their audience.
Knowing this helps you understand the pricing structure you’re going to find. A local workshop that works on demand can make you a unique t-shirt with brutal quality, but its cost per unit will always be higher than a mass-produced t-shirt from a distant factory.
When you choose where to order your t-shirt, you’re not just buying a garment; you’re supporting a way of working. Understanding the context allows you to make better decisions, value local production, and make sure you get the most out of your personalized t-shirt designs.
We resolve the doubts that always come up with designs
By this point, you’re sure to have your head full of ideas for your personalized t-shirt designs. But it’s normal, almost inevitable, that there are still some technical questions floating around. Don’t worry, we’re going to resolve the most common ones in a direct and clear way.
The goal is to give you that final confidence so that your project, whether for yourself or for a large group, turns out perfect and without any last-minute surprises.
What file format is best for my logo?
For a logo, the short and direct answer is always a vector file: AI, EPS or SVG. Think of it this way: a vector isn’t an image, it’s a mathematical formula. Whether you want to print it on a badge or on a building’s canvas, the sharpness will always be flawless.
A normal image (what we call rasterized) would look pixelated and blurry when enlarged. A vector, on the other hand, guarantees that your logo will print with clean, professional edges, regardless of the t-shirt size.
Why don’t the colors of my design look the same on the t-shirt as on the screen?
This is a classic, and it’s due to the difference between how color is created with light and how it’s created with ink. The screens on our phones and computers use the RGB model (Red, Green, Blue), which, being light, achieves very vivid and bright colors. Printing, however, works with inks and uses the CMYK model (Cyan, Magenta, Yellow, Black), which has a somewhat more limited color spectrum.
A golden tip to avoid drama: set your design program to CMYK mode from minute one. This way, the colors you see on the screen will be a much more faithful reflection of the result you’ll have in your hands.
What printing technique would you recommend for a single t-shirt with a photo?
If you want to print a single t-shirt with a photograph or a design with lots of details and gradients, direct-to-garment printing (DTG) is your best ally. Imagine it as an inkjet printer, but one that prints directly onto the t-shirt fabric.
This technique is great because it can reproduce millions of colors, smooth transitions, and incredibly fine details with spectacular quality. Trying to do something like this with screen printing or vinyl for just one unit would be extremely expensive or, quite simply, impossible.
And if what you’re looking for is inspiration or you want to take home brutal designs already ready to wear, at Tienda Camisetas Frikis we have a catalog full of creativity and passion for pop culture. Explore our collection and find your next favorite t-shirt.