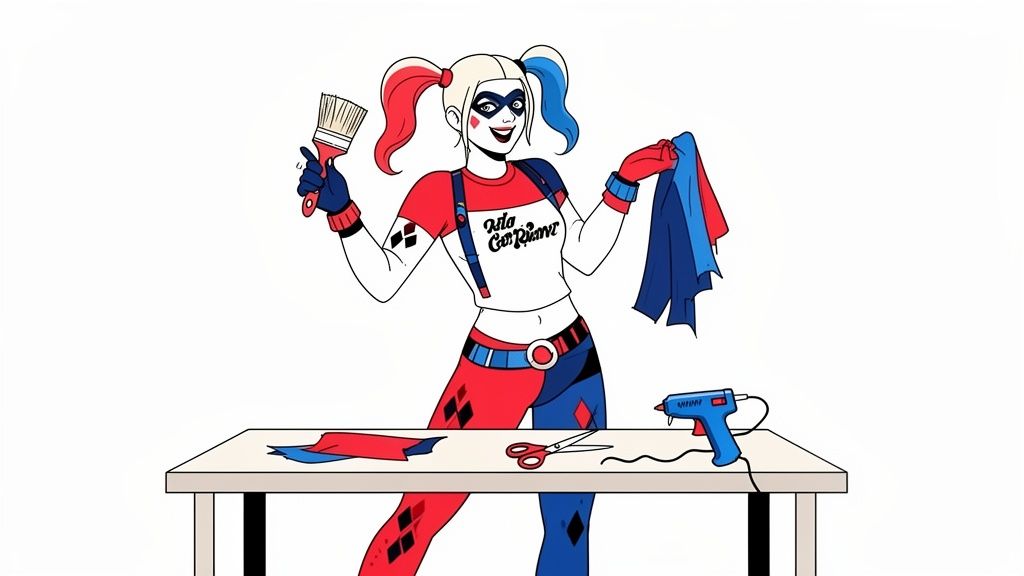
Making a homemade Harley Quinn costume is one of the coolest and most personal ways to pay homage to this iconic DC Comics character. The truth is, since we first saw her in ‘Batman: The Animated Series’, Harley has changed a lot, becoming a symbol of rebellion and style that’s begging for us to add our own personal touch, as if we were creating a custom skin for our favorite avatar.
Why Harley Quinn is the undisputed queen of homemade cosplay
Harley Quinn stopped being just the Joker’s sidekick a long time ago to become a force of nature in pop culture. Her evolution, from the classic jester suit of the animated series to her more powerful film versions, has cemented her as a total reference point for the geek and cosplayer community.
Her chaotic aesthetic and that indomitable spirit connect wonderfully with the DIY (Do It Yourself) movement, where creativity is the main tool. You’re not just making a costume, you’re making a statement of intent, almost like a mod in real life.
The evolution of a geek icon
Harley’s transformation shows in each of her appearances, and each one has its own vibe:
- Batman: The Animated Series: The original version, with her full jester suit. It pulls at nostalgia and is the favorite of the purist fans, the ones who know the show’s dialogue by heart.
- Batman: Arkham video games: The video game saga showed us a darker and more gothic Harley, with a psychotic nurse style that many gamers love to recreate. She’s the character you’d pick for a boss fight.
- Suicide Squad and Birds of Prey: Margot Robbie’s films catapulted her to worldwide fame, offering urban and very punk looks that are pretty easy to put together with clothes you already have at home and lots, lots of attitude, worthy of a Tarantino movie.
This versatility is the key to everything. Each version lets you put your own personality into it, changing details so the result is unique. There’s no single right way to be Harley, and that freedom is what makes her so incredibly attractive.
The DIY phenomenon and the community around it
The DIY movement isn’t just about saving yourself some money, it’s a form of expression in its own right. Creating a homemade Harley Quinn costume becomes a very personal project, a tribute that goes beyond buying a prefabricated suit. It’s the satisfaction of dyeing some shorts, hand-painting the “Daddy’s Lil Monster” t-shirt or creating the “Good Night” bat from scratch, as if you were in a Fallout workshop.
Harley Quinn’s popularity is no accident. Her character mixes vulnerability, strength and chaos in a way that allows each person to connect with a different facet. The homemade costume is the perfect canvas to explore that connection.
The boom of homemade Harley Quinn costumes in Spain has been incredible, especially among DC Comics followers. Online purchases of costumes and accessories doubled in 2018, and searches for “homemade Harley Quinn costumes” skyrocketed 250% in 2019, right with the release of Birds of Prey. This trend makes clear how Harley continues to inspire geek creativity on platforms like TikTok or Reddit. If you’re into it, you can discover more about these e-commerce trends on Halloween and their impact.
Gather your arsenal for creative chaos
Before you dive headfirst into creating your homemade Harley Quinn costume, you need to set up your base of operations. Think of it as if you were on the equipment screen of Batman: Arkham; choosing the right materials is the first step to making the mission a total success. The good news is that you don’t need Bruce Wayne’s budget, just a little ingenuity and this guide.
The key to a good homemade costume is the foundation you build on. Almost all of Harley’s looks, especially the ones from the movies, start with pretty normal clothes that you definitely have around the house or that you can pick up for cheap at secondhand stores. Rummaging through your closet is like exploring a level searching for hidden loot.
The base clothing: your starting point
To start, you’re going to need a few key items that will be your blank canvas. These pieces are the skeleton of almost any modern version of Harley:
- A basic white t-shirt: Whether short-sleeved or baseball style, it’s a must. It’ll be the stage for the iconic “Daddy’s Lil Monster” or any other design you feel like.
- Denim shorts (or leggings): Some old shorts are perfect for this. If you don’t have any, leggings (one red and one black/blue) are the ideal base for her most classic harlequin look from comics or games like Injustice 2.
- Fishnet stockings: They give you that punk and rebellious vibe instantly. If they’re already a little torn, even better, it adds authenticity, very cyberpunk vibes.
- A bomber jacket or synthetic leather jacket: Essential for the Suicide Squad look. Check out secondhand stores or flea markets; it doesn’t have to be perfect. In fact, the more worn it looks, the more authentic it’ll seem.
With these pieces you already have more than half the work done. Now comes the fun part: personalization, that moment when you transform normal clothes into a costume worthy of Gotham’s Queen of Chaos herself.
Tools and materials for customization
This is where your creativity really comes into play. The following materials will help you bring your vision to life and nail all those details that make a Harley Quinn costume unmistakable.
Paints and Coloring
Textile paint is going to be your best ally, no doubt about it. It’s much more effective than regular acrylics because it sets to the fabric and doesn’t crack with movement.
- Red and blue textile paint: To dye the shorts, paint details on the jacket or even to create streaks in a cheap wig.
- Black and red textile markers: Perfect for writing phrases on the t-shirt or on the bat. The fine tip gives you a precision that a brush can’t even dream of.
- Temporary color sprays: The quickest and safest way to dye your hair or a wig with Harley’s colors without making a mess.
A pro tip: use cardboard stencils for the t-shirt letters. Print the design, cut out the letters to create a stencil and use it as a guide. The result is much cleaner, almost movie-quality.
Assembly Tools and Details
In addition to the paint, you’ll need a few things to put it all together and give it that finish that makes the difference.
- Hot glue gun: It’s the Mjolnir of cosplayers. It’s great for gluing studs, patches or any decoration quickly and durably.
- Fabric scissors: Good scissors are key. They’ll let you make clean cuts to distress the shorts or adjust the t-shirt without ruining it.
- Studs and rivets: Essential for the belt and jacket details. You can find them at any fabric store without any problem.
Creating your own costume is a journey, and sometimes inspiration needs a push. If you’re looking for ideas for the t-shirt, you can check out different t-shirts with custom designs to see printing techniques or styles that you can adapt to your project.
Here’s a little comparison so you can see what makes more sense for you, whether to make it yourself or buy it ready-made:
Comparison of DIY vs Bought Materials
| Costume Element | DIY Home Option | Estimated DIY Cost | Purchased Option | Estimated Purchased Cost |
|---|---|---|---|---|
| “Daddy’s Lil Monster” T-shirt | White t-shirt + fabric paint/markers | 5-15 € | Official pre-printed t-shirt/replica | 20-35 € |
| “Property of Joker” Jacket | Second-hand jacket + gold/white paint | 15-30 € | Costume replica | 40-70 € |
| “Good Night” Baseball Bat | Toy/wooden bat + markers/paint | 10-20 € | Plastic or foam replica | 25-45 € |
| Two-tone shorts | Old denim shorts + fabric dyes | 5-10 € | Ready-made costume shorts | 20-40 € |
As you can see, the DIY option not only saves you a good amount of money, but also gives you total freedom so that the final result screams “Harley” with your own voice. In the end, what matters is that you have fun in the process and that you feel amazing with your creation.
How to nail the iconic Suicide Squad look step by step
If there’s one version that catapulted Harley Quinn to the stardom of pop culture, it was, without a doubt, the Suicide Squad film from 2016. That urban, punk, and chaotic look is perfect for a homemade Harley Quinn costume, because it’s based on pieces that are quite easy to find and, most importantly, to destroy with style. Let’s dive right into the workshop, as if we were in the Joker’s lair, to replicate this outfit piece by piece.
To keep ourselves on track, the process can be visualized in three very clear phases that will guide us from start to finish.
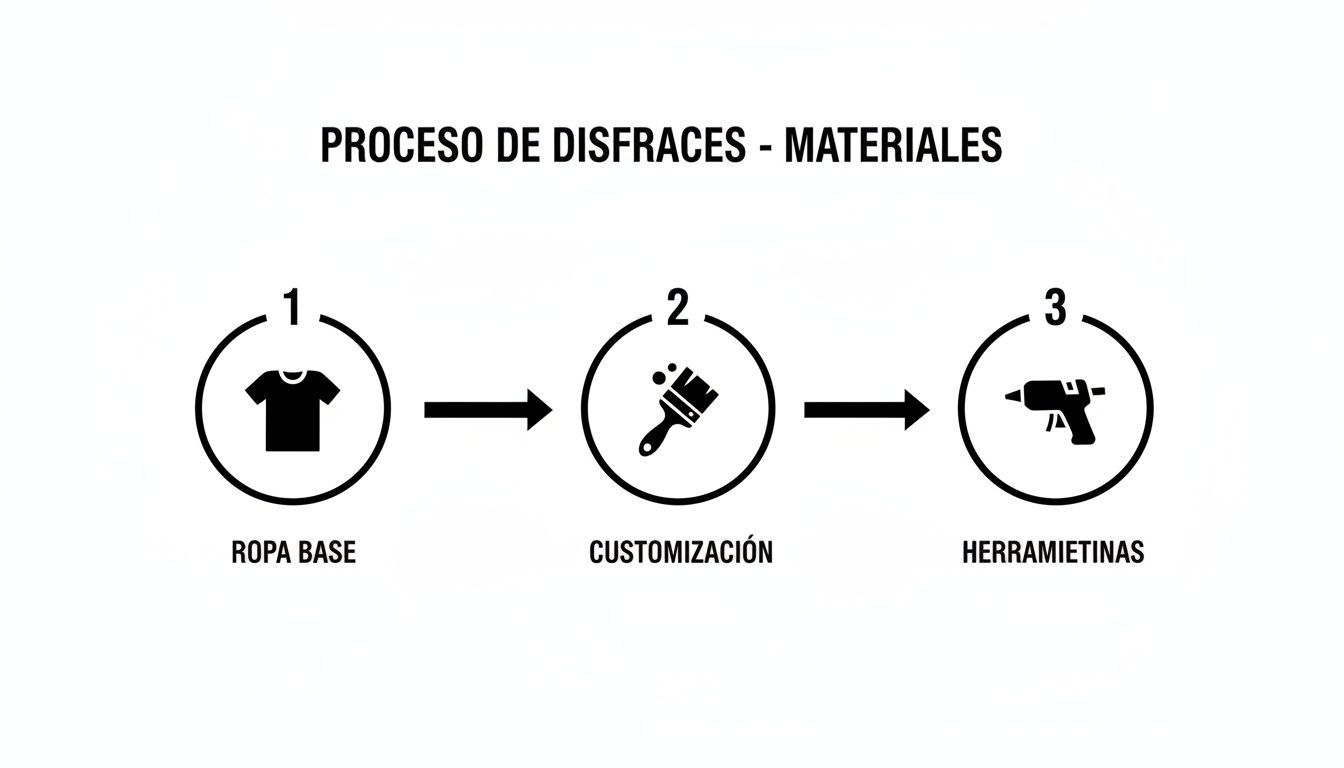
As you can see, the flow is pure logic: first, we gather the base clothing; then, we get our hands dirty personalizing it with paint and dyes; and finally, we assemble all the details with the right tools.
The “Daddy’s Lil Monster” T-shirt
The centerpiece, the one that screams “Harley Quinn” to the world, is the “Daddy’s Lil Monster” t-shirt. Don’t worry, you don’t need to be a graffiti artist for it to look amazing. First, get a white baseball-style t-shirt with red sleeves, though a plain white t-shirt works just fine too.
The secret to making the result look professional is using templates. You can print the letters with the correct typeface (search for something like “ChunkFive Roman” or similar online), cut them out to create a stencil and fix them to the t-shirt with painter’s tape. Then, use red textile paint for “DADDY’S LIL” and black for “MONSTER”.
A veteran cosplayer tip: to achieve that authentic worn look from the movie, don’t just limit yourself to painting. When the paint is dry (before setting it with an iron), gently sand the surface of the letters. You can also make small holes with scissors or a craft knife to give it that “I just got out of a fight in Gotham’s subway” touch.
For the blue and red details on the neck and sleeves, use painter’s tape to outline the lines and apply the textile paint with a fine brush. This small detail is what separates a good costume from a spectacular one.
The two-tone shorts and jacket
The shorts are the other key piece that defines the look. You need some old denim shorts, preferably short-waisted. The trick is to dye them asymmetrically: one half in bright red and the other in electric blue.
For this, it’s best to use specific textile dyes for denim clothing. Follow the manufacturer’s instructions, which normally involve submerging only half the garment in hot dye. A trick to prevent the colors from mixing is to keep the other half out of the water and completely dry.
Once dyed and dry, it’s time to add the golden details. You can use gold textile paint with glitter to paint the seams or glue small gold studs on the pockets and sides. This adds that trashy glam touch that so defines the character.
The jacket is optional, but if you get one, your costume will level up incredibly. A red and blue secondhand bomber jacket is the perfect base. With gold textile paint and a template, you’ll be able to paint the phrase “Property of Joker” on the back, replicating the iconic design from the movie.
The accessories that define the character
Accessories are the soul of any costume, and in Harley’s case, they’re what really tell her story. Each piece is a statement of intent.
- The studded belt: Look for a black faux leather belt and cover it with pyramid studs. The Joker’s buckle is more complicated, but you can 3D print a design or sculpt it with polymer clay and paint it gold.
- The “PUDDIN” choker: This is non-negotiable. Use a wide white fabric ribbon and glue on gold letters that you’ll find in any fabric store. A velcro closure on the back will make it comfortable to put on and take off. It’s a detail that true DC fans will recognize instantly.
- The gloves: A single fingerless black faux leather glove on the right hand is enough. It gives that asymmetric and functional touch, as if she’s ready for action, very much in the style of a character from the Injustice 2 video game.
Each of these elements adds up to transform basic garments into a homemade Harley Quinn costume that looks like it came straight off a film set. The key is not to be afraid of “ruining” the clothes; wear, tears and stains are part of its charm.
Give it the final touch: makeup and hairstyle for a total transformation
A homemade Harley Quinn costume, no matter how well done it is, is nothing without its characteristic makeup and hairstyle. It’s the final layer, the detail that changes everything and truly transforms you into the queen of chaos in Gotham. Harley’s look is deliberately imperfect, almost chaotic, and that is precisely its magic: it’s perfect to recreate it at home without needing to be a professional makeup artist.
Let’s break down step by step how to achieve that pale skin, smudged eyes and her iconic pigtails so that your transformation is credible and spectacular.
The pale base: the canvas of madness
The first step is nailing that pale complexion that defines Harley. Forget the typical costume white paint that cracks and creates a terrible “mask effect”. The trick is to use a makeup base two or three shades lighter than your skin. Apply it evenly with a damp sponge for a more natural and less heavy finish.
To seal the base and achieve that matte, almost ghostly finish, don’t skip the translucent powder step. This will not only unify the tone, but will help the rest of the makeup set much better and last all night, even if the party gets as wild as the ones the Joker organizes.
Asymmetrical eyes and lips that kill
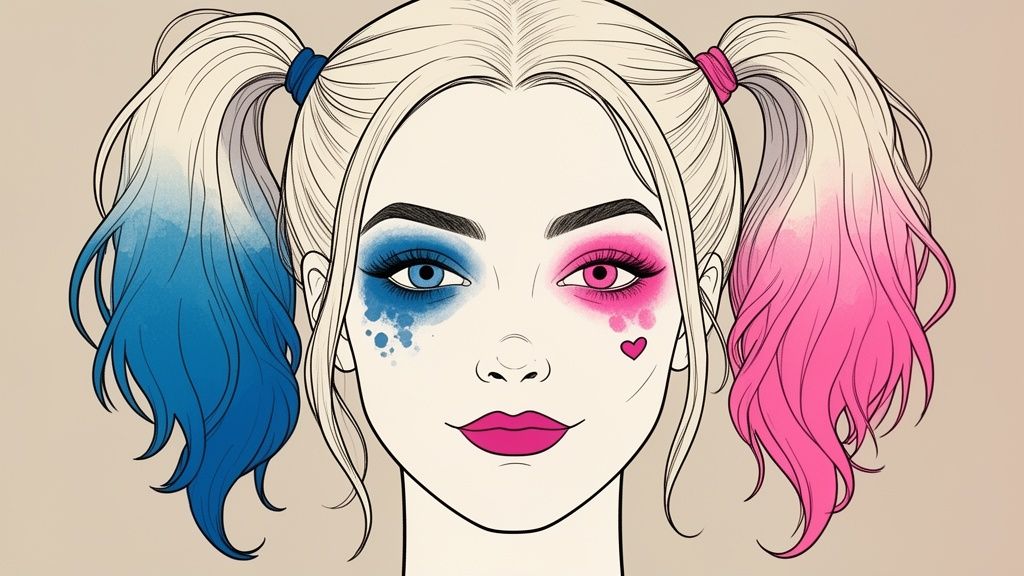
The eyes are the heart of Harley’s makeup. The key is asymmetry and that “smudged” effect, as if tears had dragged the color down her cheeks. Here, don’t look for perfection; disorder is your best friend.
- Right eye (blue): Grab a well-pigmented electric blue eyeshadow and apply it all over the mobile eyelid. Then, with a blending brush, drag the color downward, creating a trail that fades down your cheek.
- Left eye (pink/red): Now, repeat the same process, but this time with a fuchsia pink shadow or an intense red. The idea is that both eyes are a mirror image of each other, like two sides of the same coin.
To add more intensity to your gaze, line the waterline with a black pencil and apply several coats of mascara. The lips have to be a powerful and vibrant red. Outline the contour first to define the shape well and then fill in. A great trick is to slightly blur one of the corners, as if you had just sketched a manic smile.
A key tip for everything to last: use an eyeshadow primer before applying color. And when you’re done, a good makeup setting spray will keep it intact for hours, keeping the smudged effect in place without it ending up all over your face.
The final details: tattoos and the heart
It’s the small details that really elevate the costume. The tiny black heart under the right eye is non-negotiable. The easiest way is to draw it with a fine-tipped black liquid eyeliner so it comes out precise.
For the “ROTTEN” tattoo on the cheek, you can use the same eyeliner or a cosmetic marker. Don’t stress if the calligraphy isn’t perfect; Harley’s style is rough and almost improvised, as if she’d done it herself in her cell with a piece of broken mirror. If you need more ideas, you can find a lot of inspiration about Harley Quinn makeup and how to adapt it to your style.
The two-tone pigtails: the crown of the queen of chaos
And finally, the hairstyle. Her two high, tousled pigtails are her trademark. Just divide your hair into two sections, make the pigtails nice and high, and don’t worry if some strands escape. That gives it more character!
For the color, you have several options at your disposal:
- Temporary color sprays: It’s the quickest and easiest way to dye the tips blue and pink. They work great on both natural hair, even if it’s dark, and on cheap wigs.
- Hair chalk: Offers a slightly more subtle result and is very easy to apply. Just rub the chalk over the tips of each pigtail.
- Wig: If you’re looking for total accuracy or simply don’t want to stain your hair, a platinum blonde wig is the ideal solution. Then you can dye the tips with the same sprays for a longer-lasting result.
Once dyed, tousle the pigtails a bit with your fingers. The goal is to achieve a rebellious and carefree look, the hairstyle of someone who’s too busy sowing chaos in Gotham to worry about having perfect hair.
Looking for other versions of the Harley Quinn costume? Here they are!
Harley Quinn’s wardrobe is as unpredictable and chaotic as she is. Although the Suicide Squad look is an instant classic and super popular, the character has had brutal evolution in comics, film and video games. This opens up an incredible range of possibilities for putting together a homemade Harley Quinn costume that stands out from the typical.
If you want to nail a cosplay that stands out at the next Comic-Con or simply explore other facets of the queen of Gotham, here are several alternatives to spark that creative lightbulb.
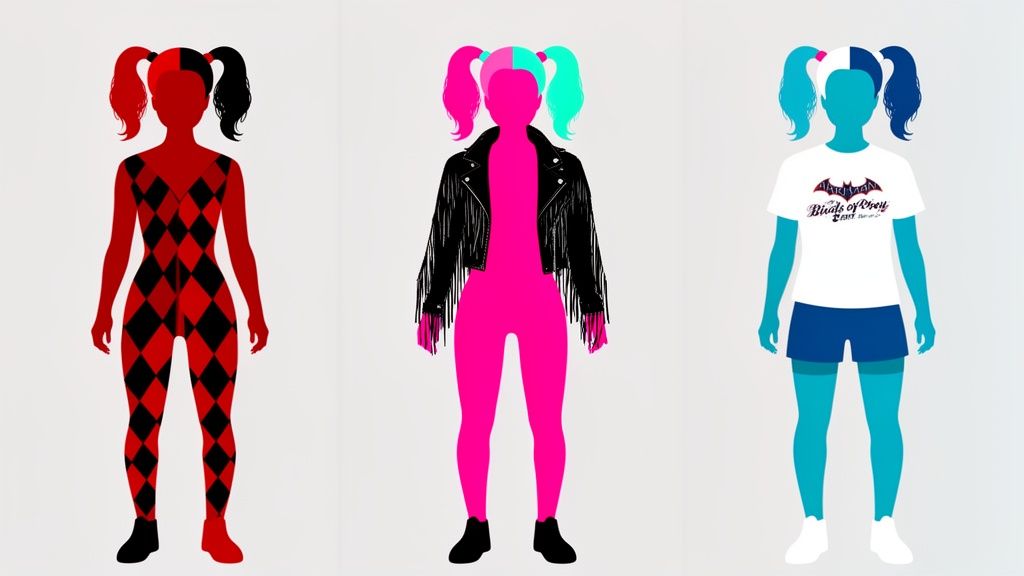
Each of these versions allows you to play with very different styles and difficulty levels, demonstrating why Harley is the perfect character for DIY cosplay. No matter which one you choose, the key is always the same: capturing her chaotic essence and that indomitable spirit.
The classic jester look from The Animated Series
For the most purist fans with a touch of nostalgia, there’s nothing like going back to the roots. The jester suit from Batman: The Animated Series started it all, and it’s a choice that will make you stand out instantly among the sea of modern Harleys. Its classic design is elegant, playful and has a retro charm that is simply undeniable.
Recreating it at home is easier than you think. The base is a fitted jumpsuit or, if you prefer, a combination of leggings and long-sleeved t-shirt. The trick is in the color division: half red, half black.
- The suit base: You can grab leggings and a t-shirt in each color and sew them down the middle. Another very handy option is to buy a white jumpsuit and dye it yourself with fabric dyes, using painter’s tape so the two halves turn out perfect.
- The diamond details: For her iconic diamonds, cut the shape out of felt in the opposite color (red on black, black on red) and glue them with fabric glue or give them a few stitches on the thighs and wrists.
- The jester cap and collar: The jester cap is essential. You can make it with the same fabric and add some bells to the tips for that characteristic jingle. The ruffled collar comes together in a snap with white tulle or felt fabric.
This costume is a direct tribute to the 90s and to the original creation by Paul Dini and Bruce Timm. It’s one of those choices that any true DC fan will appreciate instantly.
The groundbreaking style of Birds of Prey
If you’re into something more vibrant, chaotic and full of color, the Birds of Prey wardrobe is your playground. This movie showed us an emancipated Harley, and her clothes scream it from the rooftops. It’s a look that bursts with fun, independence and lots and lots of glitter.
The most iconic element is, without a doubt, her transparent jacket with fringes made from colored “caution” tape.
This outfit is an explosion of freedom. It’s like Harley raided a fabric store and a party supply store and put everything on at once. The result is visually spectacular and, surprisingly, very easy to adapt at home.
To put it together, focus on these key pieces:
- The jacket: Get yourself a transparent PVC jacket and glue strips of colored tape (yellow, pink, orange) on the sleeves to simulate the fringes. With hot glue you’ve got it ready in a moment.
- The neon pink top: A simple crop top or a bright pink sports bra is the perfect base. It doesn’t have to be exact; what matters is the color impact.
- The denim shorts: Some old shorts you can paint with vertical color stripes or cover with stars and doodles are ideal. Here there are no rules, just pure and simple creativity!
This look is a celebration of chaos and allows you to play with textures and colors like no other version.
The gamer version of the Arkham video games
The Batman: Arkham video game saga presented us with a darker, gothic and dangerous Harley. Her outfits, often featuring leather corsets and a psychopathic nurse vibe, are perfect for those who prefer a harder and more rebellious aesthetic.
One of the most accessible versions for a homemade Harley Quinn costume is inspired by the “Property of Joker” t-shirt that appears in Arkham Knight merchandise. It’s a casual and comfortable option, ideal for a last-minute costume without sacrificing the character’s essence. If you want ideas, you can find plenty of inspiration in the variety of Harley Quinn t-shirt designs available online.
Combine a t-shirt with this design (which you can paint yourself with stencils and fabric paint) with leather leggings or ripped black jeans. Add a studded belt, military boots and her classic smudged makeup to complete the look. This version shows that you don’t always need a super elaborate costume to embody Harley; sometimes, attitude and a few well-chosen details are more than enough to steal the show.
We answer your questions: the tricks of the homemade Harley Quinn costume
Creating a homemade Harley Quinn costume is awesome, but it’s normal that doubts appear in the middle of the creative chaos. Those little details always come up that can make the difference between an epic cosplay and one that doesn’t last the first round.
From what paint to use so your t-shirt doesn’t chip halfway through the party, to how to make a bat that won’t get confiscated at the convention entrance. Here we’re going to clear up the most typical questions so your project is a success and you only worry about spreading chaos (the good kind). Think of it as your personal strategy guide to overcome those side missions that appear when you least expect it.
What paint do I use on the t-shirt so it doesn’t come off in the first wash?
This is the million-dollar question for anyone starting out in the cosplay world. And the answer is simple and direct: acrylic fabric paint. Don’t take your chances with tempera or regular acrylics; they’ll crack with movement and disappear with the first wash, like a Joker henchman on a bad night.
Fabric paint is made to be flexible and withstand whatever you throw at it. Once the design is completely dry, all you have to do is iron the t-shirt inside out. The heat sets the pigment to the fabric fibers forever. Battle-proof!
To get a result worthy of a headshot:
- For large letters and designs: Go for a brush and some cardboard stencils. It’s the best way to get a clean and professional finish.
- For fine details: Fabric markers are your best friends. They give you brutal control, perfect for the “Good Night” on the bat or the tattoos.
- If you’re looking for a worn-out effect: When the paint is dry (before ironing), you can gently sand the design. It will give you that battle-worn touch that looks really cool.
I’m dark-haired, do I have to wear a wig?
Not at all! The essence of Harley isn’t about having blonde hair, it’s about her iconic two-colored pigtails. The wig is a great option to nail the look 100%, but cosplay is about having fun and adapting, not following rules to the letter.
Temporary color sprays are the quickest solution and work amazingly well, even on dark hair. They’ll give you super intense pink and blue that wash out with a simple wash. Think of them as a temporary power-up for your hair.
Another popular alternative is colored clip-in extensions. They’re cheap, you can reuse them a thousand times, and they let you add the color exactly where you want it, without staining anything.
Remember that the spirit of DIY cosplay is to make it yours. Harley herself has had a thousand versions. Adapting the hairstyle to your own hair is just another way to give the character your personal touch.
How can I make Harley’s bat so it’s safe at an event?
Safety comes first, especially at conventions or parties full of people. Don’t even think about bringing a real baseball bat. It’s banned at almost every event and, honestly, it’s a terrible idea. You need a prop that looks cool, but is safe for you and everyone else.
The best option, without a doubt, is a plastic or foam bat. You can find them easily at toy stores, variety stores, or costume shops. They’re lightweight, harmless, and look totally convincing.
Once you have your safe bat, the fun part starts:
- Give it a coat of wood-colored spray paint to make it look real.
- Wrap the handle with white fabric tape or duct tape. Don’t worry if it’s not perfect; a little unevenness gives it more authenticity.
- Write “Good Night” with a permanent black marker. Harley’s style is hands-on and a bit chaotic, so don’t go for perfect penmanship!
And there you have it. A spectacular, lightweight accessory that’s totally allowed, ready to pose in all your photos without drama.
Any tricks to keep the smudged eye makeup from ending up all over your face?
Harley’s smudged eye look is amazing, but there’s a very thin line between looking like a chaotic villain and looking like a raccoon after a nap in the rain. The secret to keeping the mess under control comes down to two words: prep and setting.
First, apply an eyeshadow primer on your eyelids. A lot of people skip this step, but it’s key. It creates a sticky base that makes the color more intense and keeps it in place.
Use powdered eyeshadows with good pigmentation. To create the “smudged” effect, blend them downward with a clean brush. And once you have the look you want, seal it! A good makeup setting spray is your best secret weapon. Spray it all over your face and your makeup will last hours, sweat, and whatever else comes your way.
An extra trick: first outline the shape of the “winged liner” with a creamy eyeshadow pencil in the same color. Then apply the powder shadow on top. The pigment will adhere to the pencil and last even longer. Your makeup will last longer than a villain’s escape plan from Arkham!
At Geek T-Shirt Store we understand that every detail is a way to shout to the world what you’re passionate about. If you’re looking for the perfect base for your next costume or simply want to wear your favorite characters in your everyday life, check out our catalog. You’ll find unique designs that speak your language. Visit https://tiendacamisetasfrikis.com and unleash your geekier side.